Designing Origami Models
Part 2 - Adding toes

This essay describes how to convert a long flap into a shorter flap with toes. Two techniques are discusses; point splitting and strip grafting. I have tried to describe the processes behind each method. Further reading is recommended:
  • Robert J Lang, Origami Design Secrets : Mathematical Methods for an Ancient Art, AK Peters Ltd publishing, 2003; Chapters 5 and 6.
  • Peter Engel, Origami from Angelfish to Zen, Dover publishing, 1994

Introduction

In my first essay on designing origami models, I discussed one method of creating a model, which was to follow the sequence of designing a base, positioning major flaps, and then adding finishing touches, such as toes, eyes, horns, etc. In this essay, I'll discuss common ways of adding finishing touches, such as toes. I will also show that they are not always independent of the first two stages.

Consider an origami base. It can be a bird base, a frog base, a complex base such as Lang's praying mantis base, or any number of bases. They all have in common a folding sequence that creates a number of flaps. A flap is formed from part of the origami square. It is often a corner, although it can also be from the side, or the centre of the model. It is these flaps that create the main features of the model.

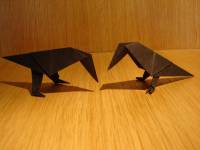
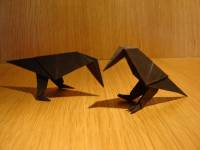
Suppose you have a simple origami model, such as a simple crow folded from a bird base. It looks elegant enough, but what if you wanted to give it toes? What if you wanted to give it three or four toes on each foot. What methods exist in origami? In Origami Design secrets, Lang discusses this problem in depth, suggesting several methods, two of which are point splitting and strip grafting.

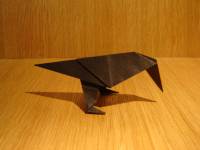
Method 1 - point splitting

Consider a flap of paper made from the corner of a square, for example, a flap of a bird base.
1) Form the flap as shown from the corner
2) Fold the flap down. The exact amount does not matter at the moment
3) Fold the tip of the flap up as shown. The fold lies perpendicular to the edge of the flap
4) Untuck a layer from under the flap and squash flat. Note the colour change if you are using two-coloured paper
5) Fold over where shown and squash flat
6) Untuck the layer on the other side
7) This is a crimp fold. Crimp the tip inside as shown
8) You have now split the flap into three points. Close the flap as shown
9) Finished flap

Now unfold the sheet of paper to see what you have folded. Have a look at the creases. This is what is referred to as a Crease pattern. Experienced paperfolders can sometimes fold a model from looking at a copy of a crease pattern alone. The crease pattern should look like this.
The sequence adds a new square shape at the end of the flap. In the case of the toes above, the square shape should look like an unfolded water-bomb base. This shape can be folded into another origami base. There is one main limitation - consider the two diagonal edges at the bottom of this square. If these have folds extending from a base crossing them, additional fold have to be made in the main flap to support them. For now, I will stick to the water-bomb design, and explain the above statement with examples later on.

This is not the only method of point splitting. Another method uses almost exactly the same folding sequence. Start again with the corner of a sheet of paper.
1) Mountain fold this time, rather than valley fold
2) Fold down, as before
3) Fold at the same angle, as before
4) This time, you are pulling out some paper from behind the flap, up to the dotted line. This should be an identical amount of paper as in step 4 in the example above
5) Fold over and squash flat
6) Pull some more paper out on the other side
7) Crimp as before to form the toes
8) Finished point split.
Note that this time, an additional point has been freed, as shown by the arrow. This corresponds to the bottom of the new square in the crease pattern shown above. As a new flap, it is very short, but can occasionally be used to provide detail in origami models.

Putting these point splits into action, consider the simple crow model shown above.
This simple model is folded from a bird base and the legs and feet are folded from two long corner flaps. These can be used to create feet by the point splitting method, so that instead of a single toe, the crow has a proper bird foot.
1) Fold the basic crow as far as step 3 above. This is one of the two leg flaps
2) Fold the tip as far as is shown. Then look at the first point splitting method described above. Start from step 2 (you already have a long flap, so don't need step 1) and fold as far as the beginning of step 7
3) Make two pre-creases at 45 degrees and 22.5 degrees
4) Crimp fold. Note that these are on the precreases that you have just made, and not in the same place as the example above
5) Reverse fold up. This creates three toes
6) Make two reverse folds to narrow the toes
7) Squash fold across
8) This step is optional. There is a flap of paper trapped in the middle which looks like the flap at the centre of a bird base. Untuck it, and flatten the foot.
9) Fold the leg back in half. Note the arrow showing that the squash fold made in step 7 should not be trapped by a layer of paper, otherwise the toes will not open nicely
10) Narrow the leg. Note that you are folding bisecting the angle of the toes, not simply bringing one half of the leg to meet the other. Now repeat the above stages with the other leg. This completes the crow with toes.
The traditional crow is on the left, the new one on the right. The point splitting method has effectively added three toes to each foot. A small triangle is present at the back of the foot to give a suggesting of a fourth, especially if it is reverse folded down.
Although this may seem a very useful method to add toes to a flap, there are problems. It can be seen above that the legs of the crow are shorter than the original. For this model, this does not make a huge difference, as the bird base provides very long flaps to begin with. In other models, where the flap is shorter to begin with, creating toes by this method can make the limb far too short.

Method 2 - Strip grafting

Strip grafting is another method to add toes to a model. Here are a few steps to show an example. Start with the corner of a square.
1) Fold a corner down. The exact distance does not matter
2) Pleat fold, using the crease as a guide
3) Diagonally fold, bringing the edges to the centre. Turn over
4) Precrease. These folds are at 45 degrees to each other. The first is perpendicular to the right edge
5) Precrease where shown - this will make life a bit easier later on
6) Crimp fold. One fold is on the precrease you made is step 4. The other is an angle bisector between this crease and the one you made is step 5
7) The next few steps look at this triangular flap at the top
8) Crimp. These folds are at 45 and 22.5 degrees
9) Reverse fold
10) Two more reverse folds to create the toes
11) Looking at the whole corner now. Fold back over to finish the foot
12) The finished flap, with three new flaps for toes

This method is different from the one above. Rather than converting an existing flap, it requires a change in the overall design of the model. Going back to the crow design, this method can be used to add toes to a simple bird-base design.

1) White side up. Make creases for the feet. These are 1/16th creases
2) Using the 1/16th creases as a guide, pleat-fold upwards
3) The next few steps concentrate on this part of the model
4) Perform steps 3-12 for forming the strip-grafted foot on this flap. Note that the diagonal creases in step 3 should be pre-creases and not folds, or the model is going to look rather odd
5) Do the same on the other foot
6) You now have a square again. Form your bird base, and fold the bird-base crow as above. Stop at step 3
7) The toes will have become trapped inside the model. You will need to release them by untucking a layer of paper. This will result in a colour change if you have used two-colour paper
8) Like so. You can now finish off folding the crow
The complete crow. If you have used two-colour paper, the inside of the legs will be white.
This second crow-with-toes has longer legs than the first example shown above. However, the use of paper is less efficient. When placed next to the original bird-base crow, the model is significantly smaller. The legs are quite thick, too.
Consider what the stripgrafting has done. Unfold the simple bird-base crow, and you end up with the crease pattern shown on the left. I have lablled where the parts of the crow model end up, the wings coming from the centre of the model. Now, imagine if the model was cut in half along the diagonal as shown, and a strip with two small squares at the end was added. These small squares could be used to add toes. Then imagine the model was taped together, and refolded - you would have a crow with toes.
In fact, this is exactly what the method above has done - a strip has been grafted into the model to create the extra paper needed to fold the toes. This is the unfolded crease pattern of the crow-with-toes 2. As said above, the overall model is smaller. This is because the method 'wastes' a lot of paper - the shaded region in the crease patter above does not contribute very much to the overall shape of the model, i.e., it is redundant thickness. So, does this mean that strip grafting is an inefficient method of designing? Not always.
Here is a simple dinosaur, folded from a frog-base. It is similar to the Procompsognathus model in the Old Diagrams section. The model is straightforward, using two of the short flaps of the frog base for arms. The model is not particularly well proportioned and has no toes. I also prefer my models to have seamless closed backs, to allow for a more 3D feel when wet-folded or foil-back folded. Can strip-grafting improve this model?
This is the basic crease pattern for the above dinosaur. I am going to add a strip-graft in a similar way to the crow above.
Rather than two squares, could a third square be added? In this model, the answer is yes, four creases come together to form a cross, with 90 degree angles between them. This usually allows a square to be inserted, as part of a graft, a sink-fold, and so on. In this case, the additional square is added into the centre of the model. When the base for the model is formed, I have taken care not to trap this square in the middle of the model. Infact, the top and bottom of the square form flaps on their own, as shown.
This allows me to redesign the model. These two flaps become the top and bottom jaws. The top half of this crease-pattern forms the tail and legs in exactly the same way, with two frog-base small flaps not used, and tucked into the centre. The bottom half is fairly different, and forms longer, more slender arms. I have used a method described as a 'wing-fold' by John Montroll in his Animal Origami for the Enthusiast book.
Finally, I use a few tricks that I will describe in a later essay to ensure the model has a seamless closed back. Some spare paper in the head forms eye-ridges, and the model becomes an Allosaurus. Above is the model folded from simple coloured A4 printer paper, standing on top of the same sized crease pattern. By adding an additional square in the middle, the design has become more efficient. What started off as a very simple model has become a complex dinosaur simply by adding a strip of paper to the crease pattern.

There is a lot more to strip grafting, which I will discuss in a later essay. As well as down the centre of the model, grafts can be added to an edge, or two edges, or even all around the model. Grafts do not even have to run in straight line from one corner or edge to another; these grafts can get quite complex. But for now, I'll leave you with adding toes.