


|
Tools of the trade
Origami is a pure artform in that it needs only one material a sheet of paper. So is that all that the aspiring paperfolder needs? Not quite; this page describes the tools that I most commonly use when crafting an Origami model.
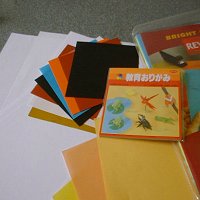
Paper
This is the most important thing to start with! However, there are many different types to use. This sort that I most commonly use is simple white 40 g/m sq. printer paper. This is very cheap to buy in large amounts and is useful for most models. The best thing about it is that it is disposable when designing a model, I will get through several draught models first. If I used commercial Origami paper for each one, this would be a very expensive artform.
|
Standard 40 g/m sq. paper comes in a variety of sizes and colours. A lot of my display models are folded from coloured A3 sized paper. This can be decorated, painted, wetfolded, and is fairly good to fold. Origami paper can be bought from various shops. This comes in packs of various sizes and is usually coloured one size, and white on the other. This is thinner than standard printer paper, and a little more durable. It is also better for ‘two-tone’ models in which both the coloured and the white size are used, for example, to create a zebra’s stripes.
|
|
|
Foil backing
|
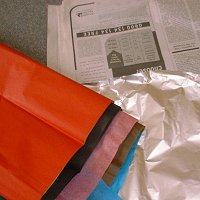
For complex models such as insects, I prefer to use foil-backed paper. This can be bought in a few gift shops but is expensive and difficult to find. I usually make my own. To do this, I buy very thin tissue paper and kitchen foil. By carefully spraying both sides with an art/craft glue and positioning the tissue, I can create a ‘paper’ ideal for complex models. This is rather messy, hence the newspaper in the picture. As this is very thin and durable, models that would become too thick to fold out of normal paper become much more appealing. It also retains its shape well, and insect legs and antennae can be molded in a way that one couldn’t do with paper.
|
|
|
Cutting
|
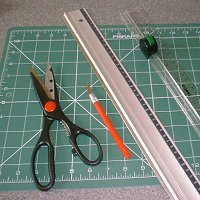
Although Origami paper comes in squares, most other paper doesn’t. As a result, it has to be cut if the model requires a square to start from. Although a good pair of scissors is an absolute must, I prefer to use a blade and a steel ruler. This is much more accurate. Another tool is seen here this is a circular blade attached to a ruler designed for cutting straight edges to measure. Finally, a good cutting mat is a far more sensible surface to cut upon than the family diner table.
|
|
|
Other tools
|
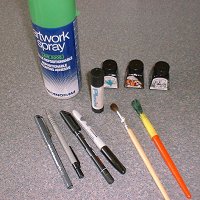
Finally, a selection of other tools comes in handy. Paper glue is useful for display purposes. For example, most of my dinosaurs have small shapes of paper glued on for eyes. A variety of inks, brushes and pens are a staple tool of mine. Before folding a model, I will often decorate a square of paper in various ways drybrushing, inkwashing, painting, etc. In this way, standard coloured paper looks so much more appealing. Lastly, art/craft spray glue is handy for texturing, foil backing and so much more.
|
|
|
|