This section is intended for the beginner. It introduces all of the major folds in origami and shows how they are done. It also provides a large number of simple models that aim to allow one to practice these folds. By the time you have finished this section of my web site, you should be able to fold most of the models in the other sections. If you cannot complete a particular fold or section, please do not give up. Keep trying! It is unusual for someone to get an entire model correct at the first time. You will need plenty of practice to make perfect.
Part 1 Paper and arrows
Most origami uses a single uncut square of paper, and this website is no exception. You can buy origami paper from most art shops and some origami websites. You can also cut a square from ordinary paper. You may wish to look at the following links.There have been many ways in which origami instructions have been diagrammed in the past. About fifty years ago, an international system began to come into use. This is the Yoshizawa-Randlett-Harbin system, which is used in almost all modern origami books. I have a few Japanese paperfolding books and although I cannot read the language, I can understand the diagrams, because they use this international system.
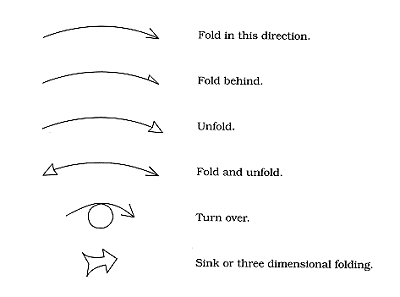
On origami diagrams, arrows show you which direction the paper is to be folded in. It is important to understand which direction the arrow is telling you to fold. Shown here is a picture of all the arrows that you will see on this site and in most origami books. You will see how these are used on the next few pages.